
How to Install a Marble Bathroom Sink Step by Step
How to Install a Marble Bathroom Sink Step by Step: A Professional Installation Guide
Installing a marble bathroom sink is a sophisticated project that requires precision, proper planning, and professional-grade techniques. This comprehensive guide provides detailed instructions for architects, contractors, and experienced DIY enthusiasts who demand the highest standards of craftsmanship in their bathroom installations.
Introduction: The Art and Science of Marble Sink Installation
Marble has been the epitome of luxury and elegance in bathroom design for centuries. From the pristine Carrara marble quarries of Italy to the exotic veining patterns of Calacatta Gold, marble sinks represent the pinnacle of natural stone craftsmanship. However, the installation of these magnificent fixtures requires a deep understanding of both the material properties of marble and the technical requirements of modern plumbing systems.
The installation process involves multiple critical phases: structural assessment, precise measurements, proper sealing techniques, and meticulous attention to waterproofing details. Unlike synthetic materials, marble is a natural stone with unique characteristics that must be respected throughout the installation process. Its porosity, weight distribution requirements, and thermal expansion properties all play crucial roles in ensuring a successful, long-lasting installation.
Professional installers understand that marble sink installation is not merely about connecting plumbing fixtures; it’s about creating a harmonious integration between natural stone beauty and functional engineering. The process requires specialized tools, premium-grade sealants, and an understanding of how marble interacts with moisture, temperature fluctuations, and structural loads over time.

Understanding Marble Properties and Installation Requirements
Before beginning any marble sink installation, it’s essential to understand the fundamental properties that distinguish marble from other countertop materials. Marble is a metamorphic rock composed primarily of calcite or dolomite crystals, which gives it both its distinctive beauty and its specific handling requirements.
The porosity of marble varies significantly depending on its origin and composition. Carrara marble, for instance, typically has a porosity range of 0.4% to 2.0%, while some exotic marbles can exceed 5% porosity. This characteristic directly impacts the sealing requirements and long-term maintenance protocols. Higher porosity marbles require more frequent sealing applications and specialized installation techniques to prevent water infiltration and staining.
Weight considerations are paramount in marble sink installations. A typical marble vanity top with an integrated sink can weigh between 150 to 300 pounds, depending on thickness and dimensions. This substantial weight requires proper structural support, including reinforced vanity cabinets and, in some cases, additional wall anchoring systems. The load distribution must be calculated to prevent stress concentration points that could lead to cracking or failure.
Thermal expansion is another critical factor that professional installers must account for. Marble expands and contracts with temperature changes at a rate of approximately 0.0000044 inches per inch per degree Fahrenheit. While this seems minimal, in large installations or areas with significant temperature fluctuations, this movement must be accommodated through proper joint design and flexible sealant applications.

Professional-Grade Tools and Materials Required
The success of any marble sink installation depends heavily on using the correct tools and premium-grade materials. Professional installers invest in specialized equipment that ensures precision, safety, and long-term durability. This section outlines the comprehensive toolkit required for a professional-standard installation.
Essential Power Tools and Equipment
Diamond-Blade Cutting Tools: A high-quality wet saw with a diamond blade specifically designed for natural stone is indispensable. The blade should have a continuous rim design to minimize chipping and ensure clean cuts. Professional-grade saws typically feature variable speed controls and water cooling systems to prevent overheating and dust generation.
Variable-Speed Drill with Masonry Bits: A heavy-duty drill capable of handling both wood and masonry applications is essential. Diamond-tipped hole saws are required for faucet and drain openings, while carbide-tipped bits are necessary for anchor installations in various wall materials.
Precision Measuring Instruments: Professional installations require laser levels, digital calipers, and precision measuring tapes. A laser level ensures perfect horizontal alignment, while digital calipers provide accurate measurements for tight tolerances around plumbing fixtures.
Lifting and Positioning Equipment: Given the substantial weight of marble installations, professional lifting equipment is crucial. This includes suction cup lifters rated for the specific weight of your marble piece, adjustable support brackets, and potentially a small crane or hoist for larger installations.

Specialized Installation Materials
Premium Structural Adhesives: Two-part epoxy adhesives specifically formulated for natural stone applications provide superior bonding strength and chemical resistance. These adhesives must be compatible with marble’s alkaline nature and provide long-term flexibility to accommodate thermal movement.
Professional-Grade Sealants: Silicone sealants designed for natural stone applications are essential. These products are formulated without acetic acid, which can etch marble surfaces. Look for neutral-cure silicones with antimicrobial properties and excellent adhesion to both marble and plumbing fixtures.
Impregnating Stone Sealers: High-quality penetrating sealers protect marble from water infiltration and staining. Professional-grade sealers typically offer 10-15 years of protection and are available in both solvent-based and water-based formulations, each with specific application requirements.
Mounting Hardware: Stainless steel brackets, anchors, and fasteners are essential for secure installation. All hardware must be corrosion-resistant and rated for the specific load requirements of your installation. Toggle bolts, expansion anchors, and structural screws should all be sized appropriately for the wall construction and load distribution.
Safety Equipment and Personal Protection
Professional marble installation requires comprehensive safety equipment due to the weight of materials, use of power tools, and potential for silica dust exposure. Safety glasses with side shields, dust masks rated for fine particulates, and heavy-duty work gloves are mandatory. Additionally, steel-toed boots provide protection against dropped materials, while knee pads and back support belts help prevent injury during extended installation periods.

Pre-Installation Assessment and Planning
Before any physical work begins, a thorough assessment of the installation site is crucial for identifying potential challenges and ensuring optimal results. This assessment phase separates professional installations from amateur attempts and often determines the long-term success of the project.
Structural Evaluation
The first step involves evaluating the existing vanity cabinet and wall structure to ensure they can support the additional weight of a marble sink. Standard bathroom vanities are typically designed for laminate or lightweight solid surface tops, not the substantial weight of natural stone. Reinforcement may be required, including additional internal bracing, wall anchoring systems, or even floor support modifications in extreme cases.
Wall construction must be carefully evaluated to determine the appropriate anchoring methods. Drywall-only installations require toggle bolts or snap toggles rated for the specific load, while installations into wood studs can utilize lag screws for maximum holding power. Masonry walls may require specialized anchors and drilling techniques to prevent cracking or spalling.
Plumbing rough-in dimensions must be verified against the specific requirements of your marble sink. Unlike drop-in sinks with standardized cutout dimensions, marble sinks often have unique mounting requirements and drain locations. Any discrepancies must be addressed before installation begins, as modifications after marble placement are extremely difficult and potentially damaging.
Environmental Considerations
Temperature and humidity conditions during installation significantly impact the curing of adhesives and sealants. Optimal installation conditions include temperatures between 65-75°F and relative humidity below 60%. Extreme conditions may require climate control measures or modified installation schedules to ensure proper material performance.
Ventilation requirements must be assessed, particularly when using solvent-based sealers or adhesives. Adequate air circulation prevents the accumulation of potentially harmful vapors and ensures proper curing conditions. Professional installations often require temporary ventilation systems to maintain optimal conditions throughout the process.

Step-by-Step Professional Installation Process
The installation of a marble bathroom sink follows a precise sequence of operations, each building upon the previous step to ensure optimal results. Professional installers understand that rushing any phase or skipping preparatory steps inevitably leads to complications that are expensive and time-consuming to correct.
Phase 1: Site Preparation and Template Creation
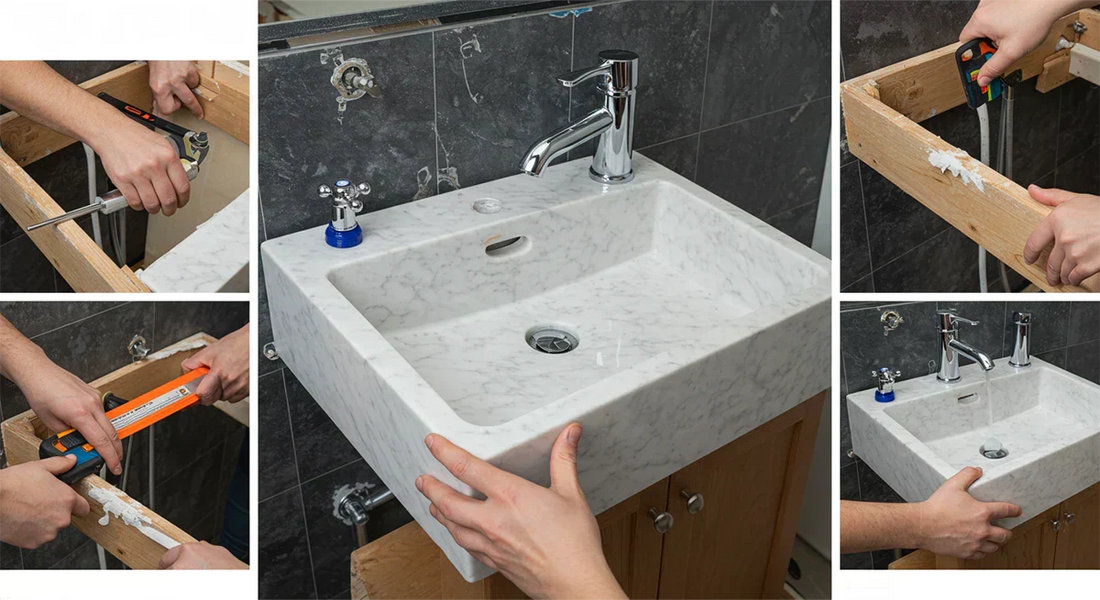
Step 1: Workspace Preparation Begin by creating a clean, organized workspace with adequate lighting and ventilation. Remove all existing fixtures, hardware, and debris from the installation area. Protect surrounding surfaces with heavy-duty plastic sheeting and masking tape to prevent damage from dust, adhesives, or accidental contact with tools.
Install temporary lighting if necessary to ensure adequate visibility for precision work. Professional installations require clear sight lines and shadow-free illumination to identify potential issues and ensure accurate measurements. Consider the placement of power tools and extension cords to prevent tripping hazards and ensure efficient workflow.
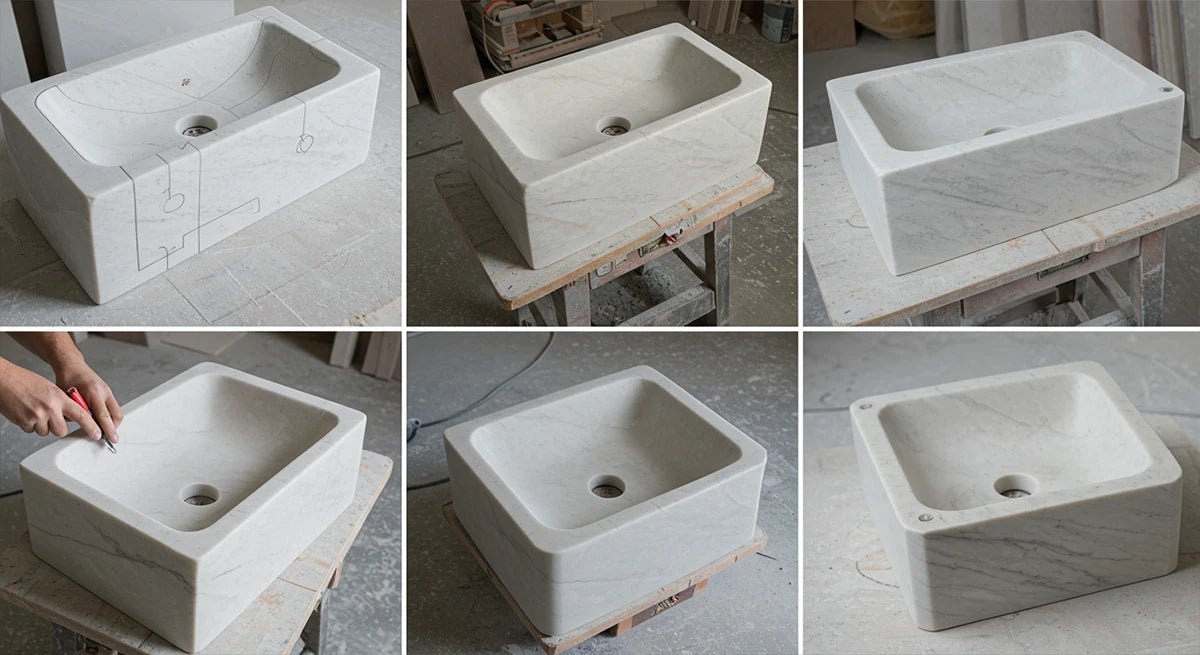
Step 2: Precise Measurement and Template Creation Create a detailed template using cardboard or thin plywood that exactly matches the dimensions of your marble sink. This template serves multiple purposes: verifying fit before handling the heavy marble piece, identifying potential interference issues, and providing a reference for final positioning.
Measure the existing vanity top opening and compare it to the requirements of your marble sink. Pay particular attention to the depth requirements, as marble sinks often require more clearance than standard drop-in models. Document any discrepancies and plan necessary modifications before proceeding.
Transfer all critical dimensions to your template, including faucet hole locations, drain centerlines, and any mounting hardware positions. Use the template to verify clearances with existing plumbing, electrical fixtures, and wall surfaces. This step prevents costly surprises during the actual installation.
Phase 2: Vanity Preparation and Reinforcement
Step 3: Structural Reinforcement Assessment Evaluate the existing vanity cabinet structure to determine if reinforcement is necessary. Most standard vanities require additional support for marble installations. This typically involves installing additional cross-braces, corner brackets, or full-width support panels to distribute the weight evenly across the cabinet frame.
Remove the existing vanity top and inspect the cabinet construction. Look for signs of weakness, such as loose joints, inadequate fastening, or insufficient material thickness. Address any structural deficiencies before proceeding with the marble installation.
Step 4: Cabinet Modification and Reinforcement Install additional support structures as required by your assessment. This may include adding 3/4-inch plywood reinforcement panels across the top of the cabinet, installing metal corner brackets at stress points, or adding vertical supports to prevent cabinet sagging.
Ensure all reinforcement materials are properly fastened with appropriate hardware. Use wood screws of adequate length and diameter to create secure connections that will not loosen over time. Apply construction adhesive at all joint interfaces to create a monolithic support structure.
Step 5: Plumbing Rough-In Verification Verify that all plumbing connections align with the requirements of your marble sink. This includes checking the position of supply lines, drain connections, and shut-off valves. Make any necessary adjustments to ensure proper alignment and adequate clearance for future maintenance access.
Test all plumbing connections for leaks and proper operation before proceeding. Address any issues at this stage, as access will be limited once the marble sink is installed. Consider installing new shut-off valves if the existing ones show signs of wear or operate poorly.

Phase 3: Marble Sink Preparation and Sealing
Step 6: Initial Marble Inspection and Preparation Carefully inspect the marble sink for any damage, defects, or variations from specifications. Document any issues with photographs and contact the supplier immediately if significant problems are identified. Minor surface imperfections can often be addressed with professional polishing compounds, but structural defects require replacement.
Clean the marble surface thoroughly with a pH-neutral stone cleaner to remove any residue from manufacturing, shipping, or handling. Avoid acidic cleaners that can etch the marble surface. Use clean, lint-free cloths and ensure the surface is completely dry before proceeding.
Step 7: Pre-Installation Sealing Application Apply a high-quality impregnating sealer to all exposed marble surfaces before installation. This pre-sealing step provides protection during the installation process and ensures complete coverage of areas that may be difficult to access after installation.
Follow the manufacturer’s instructions for application technique, coverage rates, and curing times. Most professional-grade sealers require two coats applied in opposite directions to ensure complete penetration and coverage. Allow adequate curing time between coats and before handling the marble piece.
Use a clean, lint-free applicator to apply the sealer in thin, even coats. Avoid over-application, which can leave residue on the surface, and ensure complete coverage of all porous areas. Pay particular attention to cut edges and areas around mounting holes, as these are often more porous than polished surfaces.

Phase 4: Precision Installation and Mounting
Step 8: Dry-Fit and Final Adjustments Perform a complete dry-fit of the marble sink before applying any adhesives or sealants. This critical step allows you to identify and correct any fit issues without the pressure of working with setting adhesives.
Use appropriate lifting equipment to position the marble sink carefully. Check all clearances, alignment with plumbing fixtures, and overall fit within the vanity opening. Make note of any adjustments required and remove the sink to implement corrections.
Verify that all mounting hardware aligns properly and that fasteners can be installed without interference. Check the levelness of the installation surface and make any necessary adjustments to ensure the marble sink will sit properly without stress points.
Step 9: Adhesive Application and Final Positioning Apply structural adhesive according to the manufacturer’s specifications. Use a continuous bead pattern that provides adequate coverage without excess that could squeeze out during installation. Professional installations typically use a serpentine pattern that ensures even distribution and prevents air pockets.
Work quickly but carefully during this phase, as most structural adhesives have limited working time. Have all tools and assistance ready before beginning adhesive application. Use the lifting equipment to position the marble sink accurately on the first attempt, as repositioning after adhesive contact can compromise the bond.
Apply steady, even pressure to ensure complete contact between the marble and mounting surface. Use temporary supports or clamps as necessary to maintain proper position during the initial curing period. Avoid excessive pressure that could cause adhesive squeeze-out or stress concentration.
Step 10: Mounting Hardware Installation Install all mounting hardware according to the manufacturer’s specifications. This typically includes brackets, clips, or anchoring systems that provide additional security beyond the adhesive bond. Use appropriate fasteners for your specific wall construction and load requirements.
Tighten all hardware to the specified torque values, being careful not to over-tighten and risk cracking the marble. Use a torque wrench for critical connections to ensure consistent and appropriate fastening force. Check all connections for proper engagement and security.

Waterproofing and Sealing: Ensuring Longevity and Performance
Effective waterproofing and sealing are paramount in marble bathroom sink installations. Marble, being a porous natural stone, is susceptible to water infiltration and staining if not properly protected. This section details the professional techniques for ensuring a watertight and durable installation.
Critical Sealing Points and Material Selection
Sink-to-Countertop Joint: This is the most critical sealing point. A continuous, uniform bead of high-quality, neutral-cure silicone sealant must be applied along the entire perimeter where the sink meets the countertop. The sealant should be specifically formulated for natural stone to prevent discoloration or etching of the marble surface. It provides both a watertight seal and a flexible bond to accommodate minor movements.
Faucet and Drain Openings: All penetrations for faucets, drains, and supply lines must be meticulously sealed. Use plumber’s putty or a suitable silicone sealant around the base of the faucet and drain assemblies to prevent water from seeping into the vanity cabinet. Ensure that all washers and gaskets are correctly seated and tightened according to the manufacturer’s instructions.
Backsplash and Side Splash Joints: If a backsplash or side splashes are installed, the joints where they meet the wall and the countertop must also be sealed with silicone. This prevents water from running down behind the vanity and causing damage to the wall or floor. A clean, consistent caulk line is essential for both aesthetics and functionality.

Application Techniques for Watertight Seals
Surface Preparation: Before applying any sealant, ensure all surfaces are clean, dry, and free of dust, grease, or old sealant residue. Use denatured alcohol or a specialized cleaner to prepare the surfaces for optimal adhesion. Proper preparation is key to a long-lasting seal.
Applying the Sealant: Cut the tip of the silicone tube at a 45-degree angle to create a bead size appropriate for the joint. Apply the sealant with a steady, even pressure, maintaining a consistent bead. For critical joints, a caulk gun with a smooth trigger mechanism allows for better control.
Tooling the Bead: Immediately after applying the sealant, tool the bead with a caulk tool, a gloved finger, or a damp sponge. This forces the sealant into the joint, creates a smooth, professional finish, and ensures maximum contact with both surfaces. Remove any excess sealant promptly with a clean cloth or a specialized sealant remover before it cures.
Curing Time: Allow the sealant to cure fully according to the manufacturer’s recommendations before exposing it to water. This typically ranges from 24 to 72 hours, depending on humidity and temperature. Premature exposure to water can compromise the seal’s integrity.
Long-Term Protection with Impregnating Sealers
Beyond the initial installation sealing, regular application of an impregnating stone sealer is crucial for the long-term protection of the marble itself. These sealers penetrate the stone’s pores, creating a barrier that repels water, oils, and other staining agents without altering the marble’s natural appearance or breathability.
Selection of Sealer: Choose a high-quality impregnating sealer specifically designed for natural marble. Solvent-based sealers often offer deeper penetration and longer-lasting protection, while water-based options are more environmentally friendly and easier to apply. Consult with a stone care professional for recommendations tailored to your specific marble type and usage.
Application Frequency: The frequency of reapplication depends on the marble’s porosity, the amount of use the sink receives, and the type of sealer used. Generally, marble sinks in high-traffic bathrooms may require sealing every 6-12 months, while those in less frequently used areas might only need it every 1-3 years. A simple water bead test can indicate when reapplication is necessary: if water soaks into the marble rather than beading on the surface, it’s time to reseal.
Application Process: Ensure the marble surface is thoroughly clean and dry before applying the impregnating sealer. Apply the sealer evenly with a clean cloth or a low-pressure sprayer, allowing it to penetrate for the recommended dwell time. Wipe off any excess sealer before it dries on the surface to prevent hazing or residue buildup. Buff the surface with a clean, dry cloth to a uniform finish.

Maintenance and Care: Preserving the Beauty of Your Marble Sink
Proper maintenance and care are essential for preserving the pristine beauty and structural integrity of a marble bathroom sink. Marble, while durable, is a natural material that requires specific cleaning protocols to prevent etching, staining, and long-term damage. This section outlines professional best practices for maintaining your marble investment.
Daily Cleaning Protocols
Gentle Cleaning Agents: For daily cleaning, use only pH-neutral cleaners specifically formulated for natural stone. Harsh, acidic, or abrasive cleaners (e.g., vinegar, lemon juice, bleach, scouring powders) will etch the marble surface, leading to dull spots and permanent damage. A mild dish soap diluted with water is often sufficient for routine cleaning.
Soft Cleaning Tools: Always use soft cloths, sponges, or chamois for cleaning. Avoid abrasive scrubbers, steel wool, or stiff brushes, which can scratch the polished surface of the marble. Microfiber cloths are ideal for their softness and ability to capture dust and grime effectively.
Immediate Spill Cleanup: Marble is porous and susceptible to staining from acidic liquids (e.g., fruit juices, coffee, wine, certain cosmetics) and oils. Any spills should be wiped up immediately to prevent penetration and permanent discoloration. Blot, do not wipe, to avoid spreading the spill.
Drying Surfaces: After cleaning, always dry the marble surface thoroughly with a clean, soft cloth. Leaving water to air dry can lead to water spots or mineral deposits, especially in areas with hard water. Regular drying helps maintain the marble’s luster.

Stain Removal and Poultice Application
Despite best efforts, stains can occur. The approach to stain removal depends on the type of stain:
- Oil-Based Stains (grease, cooking oil, cosmetics): These stains darken the stone. A poultice made with a mild liquid cleanser (e.g., ammonia, mineral spirits, or acetone) and an absorbent material (e.g., baking soda, kaolin clay) can draw out the stain. Apply the poultice, cover with plastic wrap, and let it sit for 24-48 hours before removing and rinsing.
- Organic Stains (coffee, tea, fruit, food): These stains typically leave a pinkish-brown mark. A poultice made with hydrogen peroxide (12% or higher, if available) and an absorbent material is effective. Bleach can also be used, but sparingly and with caution, as it can lighten the marble.
- Water Spots/Mineral Deposits: These are often caused by hard water. Gentle scrubbing with a soft pad and a non-acidic cleaner designed for mineral deposits can remove them. For stubborn spots, a professional marble polishing compound may be required.
Poultice Application Technique: For all poultices, ensure the area is clean and dry. Mix the absorbent material with the chosen chemical to form a thick paste, similar to peanut butter. Apply a 1/4 to 1/2 inch thick layer over the stain, extending beyond the stain’s edges. Cover with plastic wrap and tape the edges to prevent drying. Allow it to work for 24-48 hours, then remove the plastic, let the poultice dry completely (it will pull the stain as it dries), and then scrape it off with a plastic scraper. Rinse thoroughly with distilled water.

Preventing Damage and Long-Term Protection
Use of Trays and Coasters: Place decorative trays or coasters under toiletries, soaps, and cosmetics to prevent direct contact with the marble surface. Many common bathroom products contain ingredients that can etch or stain marble over time.
Avoid Excessive Heat: While marble is heat-resistant, extreme temperature fluctuations can cause thermal shock. Avoid placing hot styling tools (e.g., curling irons, flat irons) directly on the marble surface. Use a heat-resistant mat.
Regular Sealing: As discussed in the previous section, regular reapplication of an impregnating sealer is the most critical long-term maintenance step. This protective barrier minimizes the absorption of liquids and extends the life and beauty of your marble sink.
Professional Inspection: Consider periodic professional inspections, especially for high-traffic or commercial installations. Stone care specialists can identify early signs of wear, re-polish etched areas, and re-seal the marble to ensure its longevity.
By adhering to these professional maintenance and care guidelines, your marble bathroom sink will retain its exquisite appearance and provide lasting elegance for decades to come. The investment in proper care is an investment in the enduring beauty and value of your property.
Conclusion: A Lasting Investment in Elegance
Installing a marble bathroom sink is more than just a home improvement project; it is an investment in timeless elegance and sophisticated design. While the process demands precision, specialized tools, and a meticulous approach, the enduring beauty and luxurious appeal of a properly installed marble sink are unparalleled. For architects, designers, and discerning homeowners, understanding the nuances of marble properties, employing professional installation techniques, and committing to diligent maintenance are key to realizing the full potential of this magnificent natural stone.
By following the comprehensive guidelines outlined in this guide, you ensure not only the structural integrity and functional performance of your marble sink but also its aesthetic longevity. A well-installed and maintained marble sink will serve as a focal point of luxury in any bathroom, reflecting a commitment to quality and an appreciation for the finest materials. Embrace the art and science of marble installation, and enjoy the lasting legacy of unparalleled beauty in your home or project.

1. https://arenamarble.com/vanity-top/essential-tools-for-installing-your-vanity-top/